On this page
LinkedIn is a goldmine, it's the largest B2B database in the world : 1 billion members worldwide.
For context, that's 4,000 times more than the number of dead green plants in open spaces.

Whether you're in sales, marketing, recruitment, or another field, mastering this network is a key skill today.
Sales Navigator is LinkedIn's premium version. The tool can work wonders when used the right way.
So buckle up, I’ll explain everything and give you the best tips to get the most out of the tool.
What is Sales Navigator, and how does it work?
Presentation of Sales Navigator
The tool allows you to :
✔️ Build lists of companies.
✔️ Build lists of contacts.
✔️ Segment with (more or less) precise filters.
✔️ Save searches to receive alerts.
✔️ Send InMails and send more connection requests than with a basic LinkedIn account.
✔️ Exceed the basic search limits you have on LinkedIn.
Pro Tip: Sales Navigator is the go-to tool for building prospect databases—nothing else offers this level of precision at scale.

You can find a comparison of the main tools on the market right here : Best LinkedIn Sales Navigator Alternatives.
LinkedIn Sales Navigator subscription and key features
There are three different Sales Navigator subscriptions, each with its own features.
Let's compare them! Figggggght!

1. LinkedIn Sales Navigator Core:
Price: €99.99 per month for a single user.
Features:
🛠 Access to advanced search tools to identify relevant contacts.
📌 Ability to save leads and accounts.
📩 Sending 50 InMails per month to contact people outside your network.
⚡️ Real-time alerts on activities of tracked prospects and companies.
🔗 Integration with certain CRMs to synchronize data.
![LinkedIn Sales Navigator Cost In 2025 [Plans Comparison]](https://cdn.prod.website-files.com/66e2b74a4b25ba70adce8eb2/67ea93766173c945cf9069c7_AD_4nXdbN07cEUF4iuXDxy_Pb9jn1H7e7M2BD_BHy5X9v3UEpvnAqOEhsgtSiRFp418R2_Xx_XsgpRV0Z5KN8n-mhYfHk1Cko1TLogPK_70sa-DFIPpFruU2re4AVPErgyPAGsyXiZUp.png)
2. LinkedIn Sales Navigator Advanced:
Price: €149.99 per month, suitable for sales teams requiring shared access.
Additional features:
👥 Shared access between multiple users.
🤝 Collaborative features for sales teams.
🔗 Advanced integration with CRMs such as Salesforce or Microsoft Dynamics.
3. LinkedIn Sales Navigator Advanced Plus:
Price: Not publicly specified; determined based on the company's specific needs.
Additional features:
🔗 Deeper integration with CRMs.
🏢 Customized features tailored for large enterprises.
🧑🔧 Dedicated support and training options for teams.

"Some are whispering that it could cost 1600€/year with a minimum of 15 seats"
Pro Tip: Sales Navigator subscriptions are built for prospecting—if you're in recruitment, go with Sales Navigator Recruiter to get the features designed for hiring.
Why use Sales Navigator for your lead generation ?

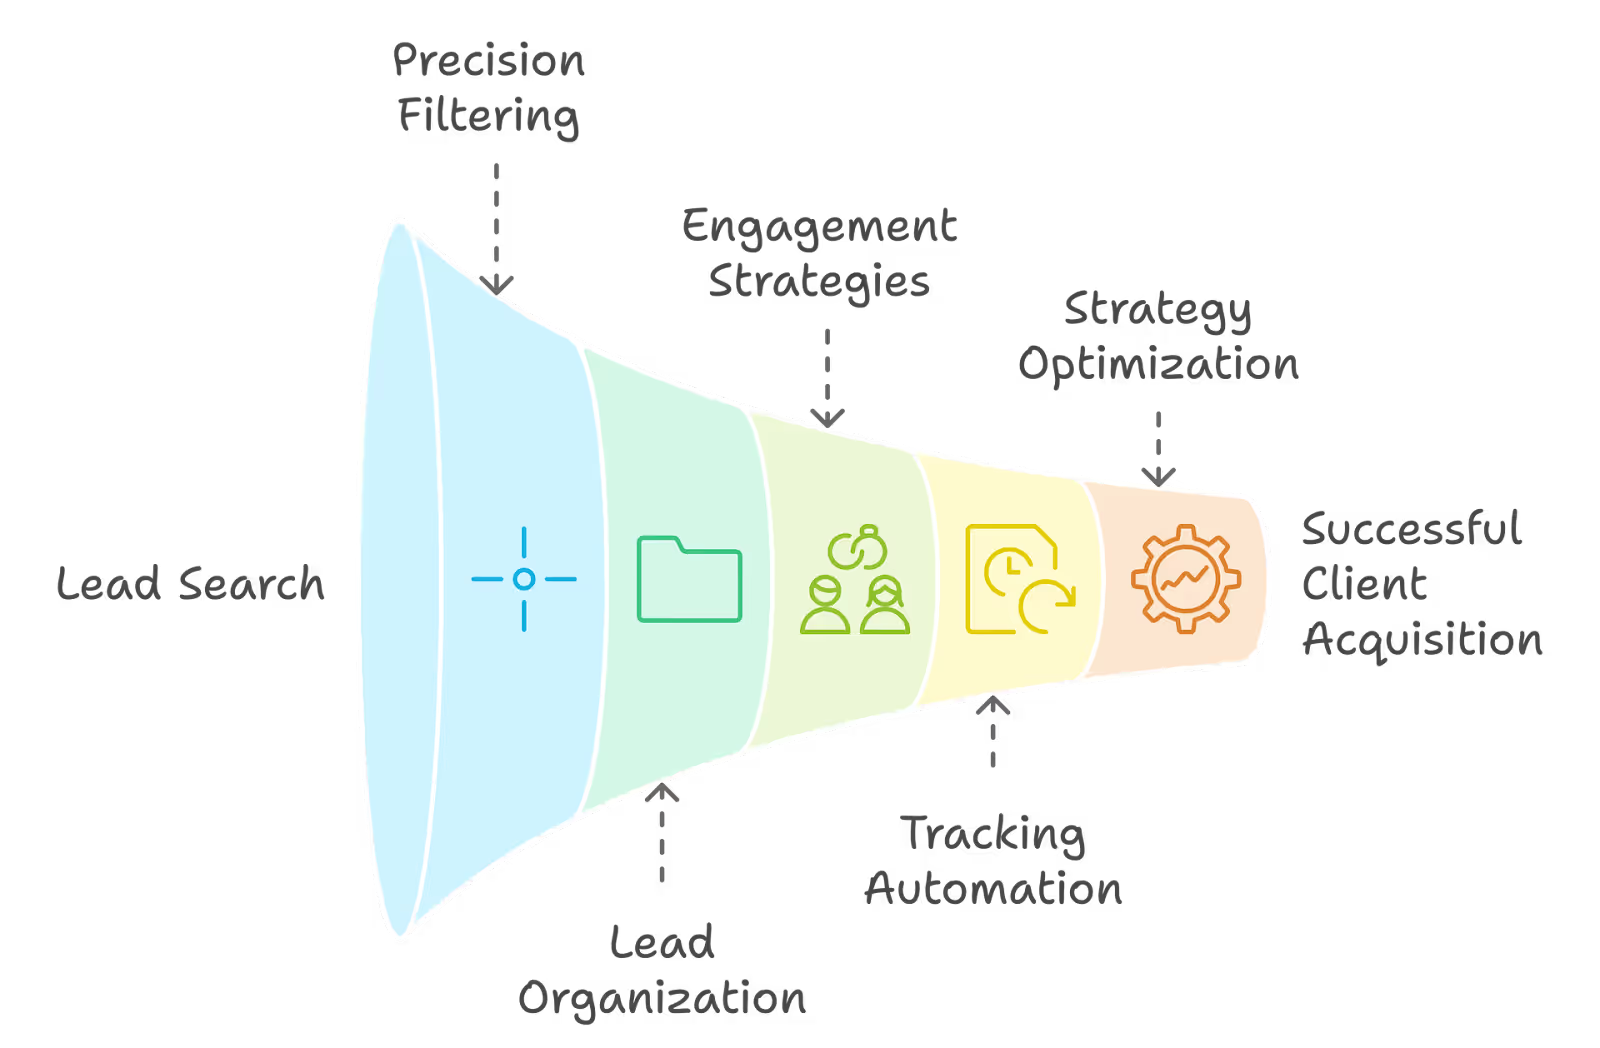
LinkedIn Sales Navigator is one of essential tool today if you're doing B2B prospecting. Here's an overview of its main features to optimize lead search and find new clients :
🔍 Use Advanced Filters for maximum precision in your searches
- Master Boolean search (AND, OR, NOT) for highly targeted results.
- Easily exclude irrelevant profiles, current clients, and competitors.
📝 Organization and Management of leads
- Create segmented lists based on your business criteria.
- Categorize your prospects for efficient tracking.
- Export your data in CSV format for in-depth analysis.
📩 Engagement and Communication
- Send personalized invitations to maximize acceptance rates.
- Use InMails strategically at no additional cost.
- Contact Open Profiles for free to expand your network.
🤖 Tracking and Automation
- Set up custom alerts to monitor your contacts' activity.
- Save recurring searches to save time.
- Automate your lead generation processes.
📊 Analysis and Optimization
- Analyze your results to refine your strategy.
- Measure your conversion rates.
- Continuously optimize your prospecting campaigns.
Let’s now dive into the detailed use of Sales Nav so you can use it effectively to prospect on LinkedIn or via email and find potential clients.
Best practices with Advanced Search Filters on LinkedIn Sales Navigator
There are many filters available on LinkedIn Sales Navigator. Let’s go through them one by one so you can decide which to use based on your specific use case.
Find the right companies with Advanced Search Filters
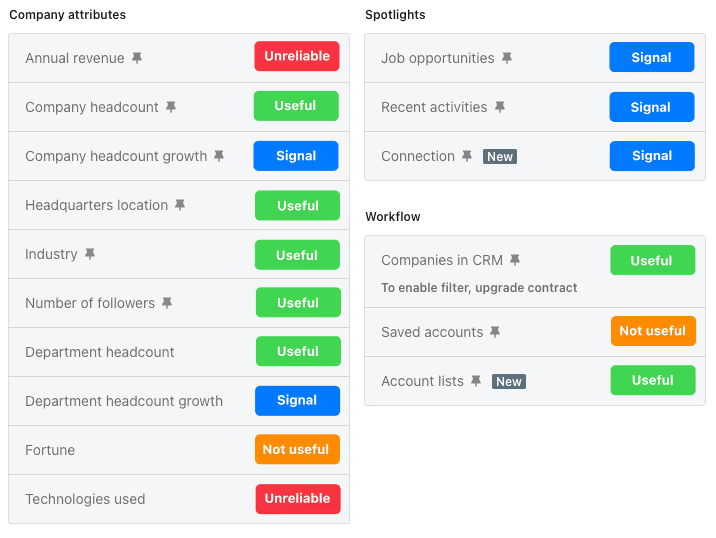
🔴 Annual Revenue → Unreliable
It relies on declared annual revenue, but since not all companies disclose this publicly, LinkedIn estimates a range that is often inaccurate.
The algorithm determines this range, and there’s no information on how frequently it is updated.
🟢 Number of Employees → Useful
This is essential for segmenting by company size.
🔵 Headcount Growth → Signal
Based on growth over the past 12 months, it's useful for targeting growing companies.
Pro Tip: Growth often indicates potential openness to investing in new solutions — target headcount growth to catch them at the right time.
🟢 Headquarters Location → Useful
A must-have for segmenting geographically by country, region, or city.
🟢 Division Size → Useful
Helpful for segmenting by the total number of employees in a specific department. However, be cautious of potential inaccuracies.
🟢 Industry → Useful
This is essential, even mandatory, for segmenting by industry.
You can find the full list of LinkedIn’s industries here: [link].
🟢 Number of Followers → Useful
If you want to segment your list by popularity, this will be helpful.
🔴 Technology Used → Unreliable
To avoid! According to LinkedIn, this data is based on "a technological data source," but no further details are provided about how this data is collected. Results are often incomplete or inaccurate.
🟠 Fortune → Not Useful
To target companies listed in Fortune magazine's Fortune 500 rankings.
🔵 Division headcount growth → Signal
Use it to prioritize departments experiencing growth within a company, if relevant.
🔵 Recent activity → Signal
Based on LinkedIn activity or recent news:
- Leadership Changes in the Last 3 Months → Potentially more open to new collaborations/solutions.
- Fundraising in the Last 12 Months → Indicates a need to accelerate growth.
🔵 Job openings → Signal
Very useful for identifying companies currently hiring. However, if the job posting isn’t on LinkedIn, it won’t appear.
Other methods exist to detect hiring regardless of the platform used for the job posting: [link].
🔵 Connections → Signal
Allows you to see companies within your network. If some match your persona, you have an entry point to prospect them.
🟢 Account Lists → Useful
Helpful for searching within a list of companies you’ve created or excluding a list of companies from your search.
Pro Tip: If there are companies you don’t want to contact (your clients, for instance), create a list with all these companies and then set it as an exclusion list in your searches.
Check out how to create a list in LinkedIn Sales Navigator for more info.
🟠 Saved Accounts → Not Useful
This shows all the companies you’ve saved in your lists.
🟢 Companies in the CRM → Useful
If you have a Sales Navigator Advanced Plus subscription, you can link your CRM to your account.
This allows you to easily import them and perform searches among the companies in your CRM.
Filters I use most frequently:
- Company size
- Industry
- Headquarters location
- Company employee growth
- Account list
If you need further help with how to search for companies on LinkedIn Sales Navigator, check out this step-by-step guide.
Now let’s move on to contact filters, and then I’ll show you how to create your first prospecting lists!
Find the right leads with Advanced Search Filters
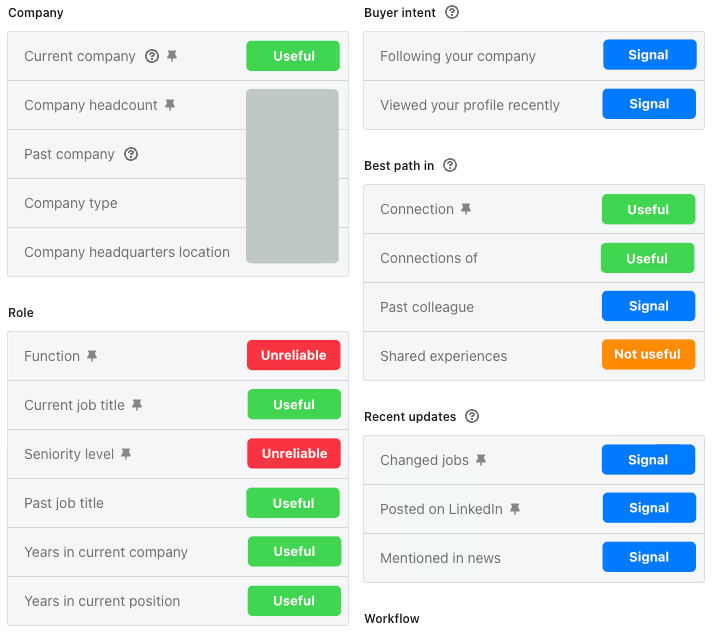
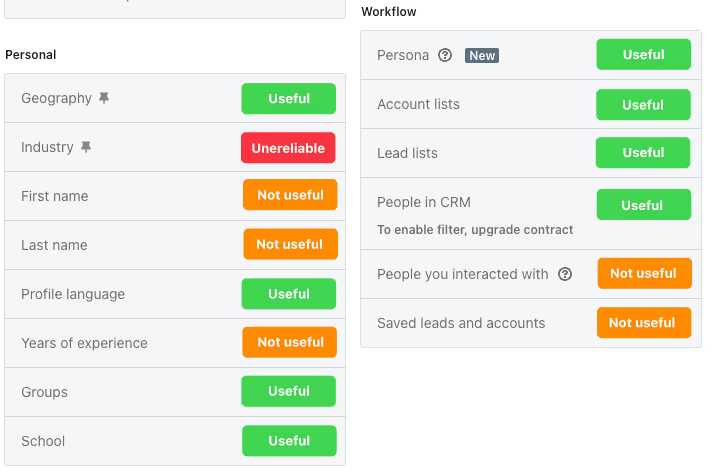
🟢 Current Company → Useful
Great for searching for people within a specific company or excluding certain companies from your searches.
🔴 Function → Unreliable
Determined by LinkedIn's algorithm based on job titles and often contains errors. Additionally, a person may have multiple ongoing roles, resulting in different functions.
🟢 Current Job Title → Useful
You should use it to target your persona. The drawback is that Sales Navigator isn’t very precise. Techniques like Boolean searches can help improve results — I’ll explain more about this later in the guide.
🔴 Seniority Level → Unreliable
Also determined by LinkedIn’s algorithm, it bases results on hierarchical relationships and user-input information about their managers. These details are often inaccurate, leading to poor results.
🟢 Geography → Useful
Don’t confuse this with the company's headquarters location. This is very useful for targeting individuals working in a country while their company has headquarters abroad, for example.
🔴 Industry → Unreliable
Based on the sector specified by the individual on their profile. Many errors occur because most people input their personal sector rather than their company’s sector. Instead, I recommend using company sectors for filtering.
🔵 Following Your Company → Signal
There may be hidden opportunities with people who follow your company without you knowing. Check the followers of your company, match them with your LinkedIn Sales Navigator Personas, and reach out to them.
Pro Tip: Use a "hack" to find followers of your competitors :
- Go to your LinkedIn profile.
- Add an experience listing your competitor as your employer (just for a few seconds 🙃).
- Return to Sales Navigator.
- Activate the "Following Your Company" filter.
- Voilà, you now have access to all your competitor's followers.
If this technique doesn’t work, you can use a tool like Scrapeli to extract followers of a company page.
🔵 Recent Profile Views → Signal
If someone visits your profile, it means something caught their attention.
Pro Tip: Profile views are warm signals — don’t let them go cold. Reach out while you’re still top of mind.
🟢 Connections → Useful
Your network is likely full of opportunities. Look for people who match your personas and start a conversation.
🟢 Connections of → Useful
If you know someone in common, you can ask them to introduce you to the lead.
🔵 Former Colleague → Signal
This can be an interesting signal for prospecting a former colleague who has joined a company matching your ICP (Ideal Customer Profile).
🟠 Shared Experiences → Not Useful
If relevant, you can use it as an icebreaker.
🔵 In the News → Signal
Based on over 800 news sources. If the person is mentioned in the news, it can be an interesting personalization element for your messages — if relevant.
🔵 New Role → Signal
It’s known that individuals typically spend 70-80% of their budget within the first three months of starting a new position. This is a strong signal to segment and prioritize those who are new to their company.
🔵 LinkedIn Posts → Signal
Excellent for targeting those active on LinkedIn. You can also reference or engage with their latest post in your messages, if relevant.
🟢 Persona → Useful
To save your searches. This will save you from having to retype them every time. Check out how to save a search in LinkedIn Sales Navigator.
🟢 Account List → Useful
Allows you to search for your persona within a list of companies you’ve created. I’ll show you exactly how to do this!
Filters I use most frequently :
- Current Job Title
- Geographic Area
- Recent Profile Views
- New Role
- LinkedIn Posts
- Persona
- Account List
- Following Your Company
How to Use LinkedIn Sales Navigator for outreach
Now that you know all about Sales Navigator filters, let me explain how to use them effectively for cold outreach. I’ll share best practices and real-world examples you can apply right away!

Pro Tip: In 95% of cases, the best approach for great results is to create a list of companies and then search for leads within that list.
Creating Your Company List
Now let’s move on to creating your first company list.
Suppose I want to target companies with 11 to 50 employees in France, in the "Software Development" sector, with a workforce growth of at least 20% over the past year. I have 582 results:
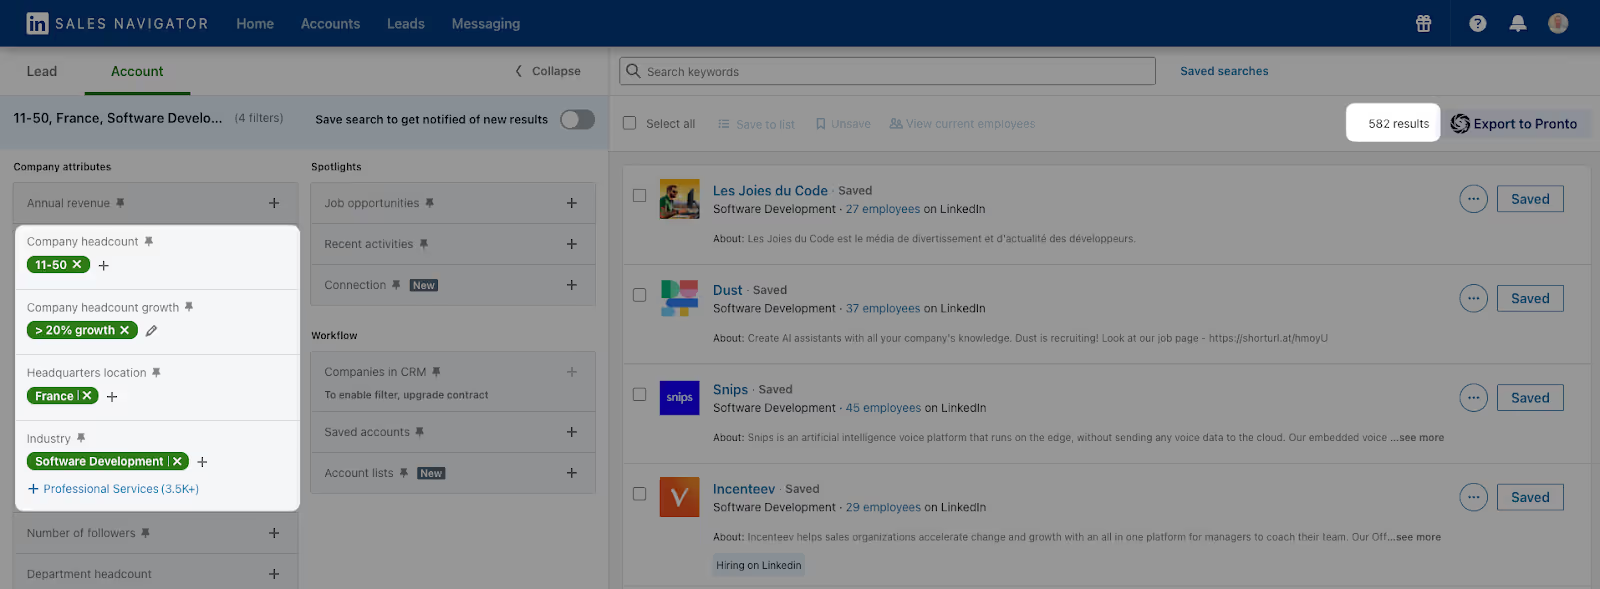
Scrolling through my search results, I notice some companies in the "Video Game" sector:

However, I want only companies in the "Software Development" sector. To refine the search, I’ll exclude the "Video Game" sector. Now I have 558 results:

If you want to refine your search even further, you can use the search bar at the top of the page.
LinkedIn will search for the keyword(s) you enter across the company or individual profiles (description, experience, education, etc.).
For example, if we wanted to target only SaaS companies working in AI, we could type "AI" into the search bar:

Once you're satisfied with your company list, you'll need to create a list to search for contacts within those companies.
You have two options for this:
1️⃣ Unfortunately, LinkedIn doesn’t offer a “select all” button. If you have some time to spare, you’ll need to select the 25 results on page 1, save them to the list you’ve created, then move on to page 2 and do the same, then page 3, page 4, and so on:

2️⃣ If, like me, you enjoy time-saving hacks, I recommend Pronto — the best LinkedIn Sales Navigator scraper out there. Just copy the URL of your Sales Navigator search, head over to Pronto, and click on “New Playbook.” Then go to the playbook “From URL” and click “Use this playbook”:

Paste the URL of your search, click “Find companies” and then “Save list to your account” and let the magic happen:

In a few minutes, you’ll have your company list on Sales Navigator.
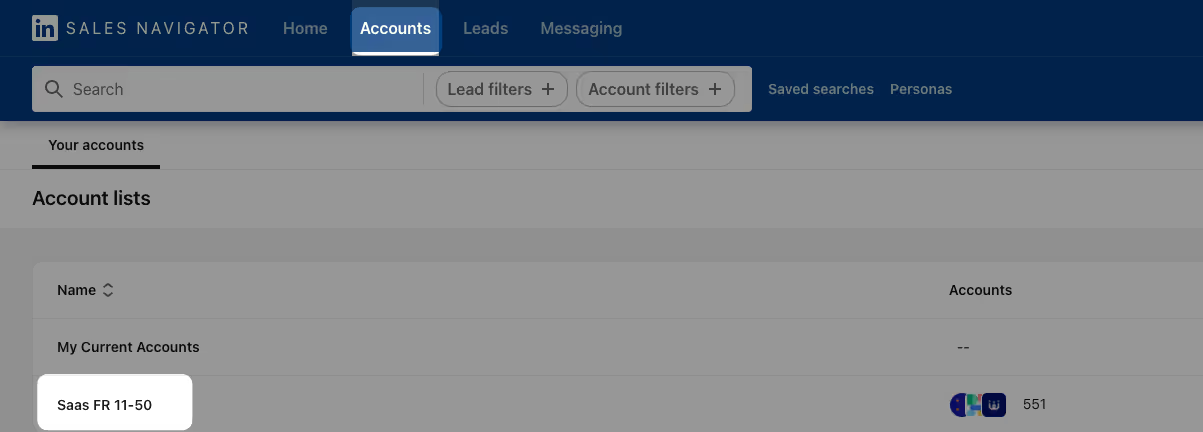
Already have a list of target accounts? Learn how to import it directly using the LinkedIn Sales Navigator upload list option.
Create your leads list
Now that your company list is ready, you need to find the right people to contact within that list: your persona!
Go to the lead search and select the account list you just created. Now you are sure that everyone present here works in one of your target companies, this method minimizes targeting errors:
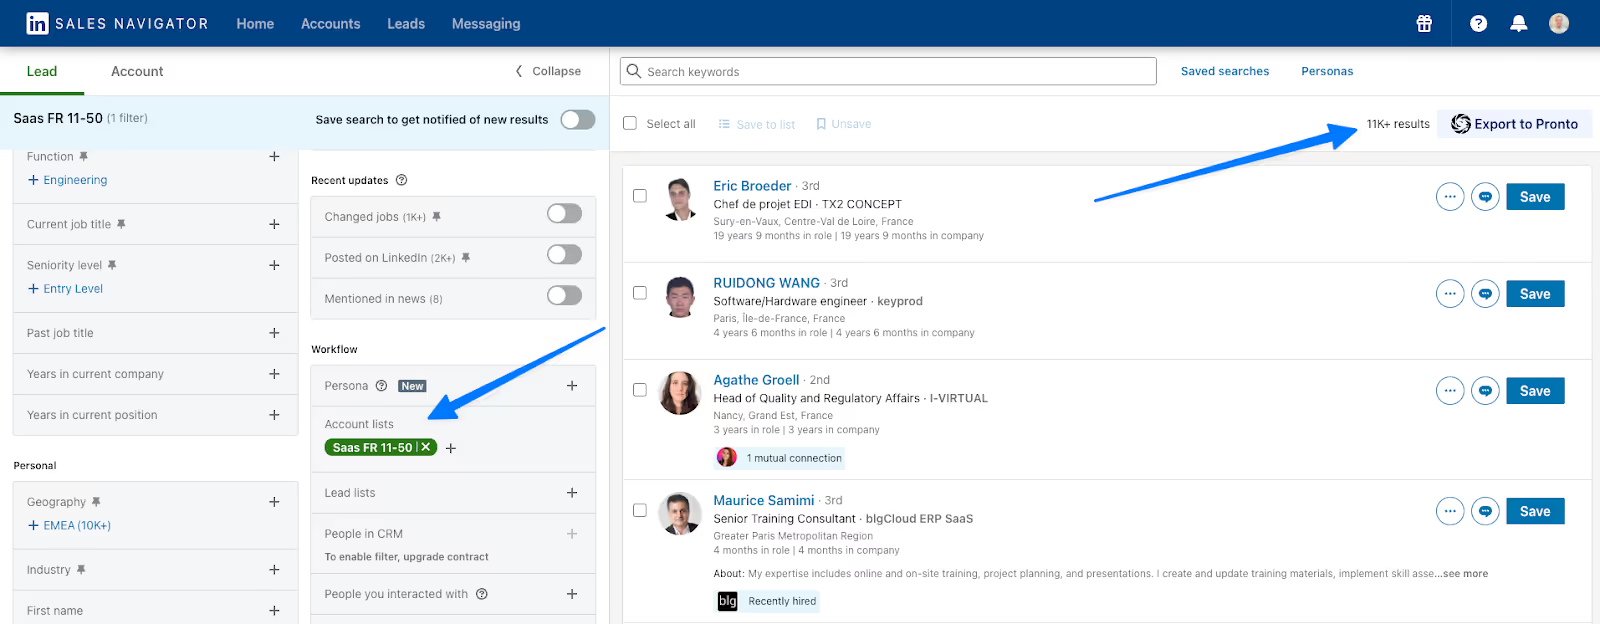
The company filters don’t need to be filled in again since you’ve already done that earlier.
First, what interests us is targeting the right people, and for that, we’ll use the “current job title” filter.
The problem with Sales Navigator is that if you enter “marketing director,” it will only find marketing directors and won’t include “marketing manager,” “head of marketing,” “CMO,” or any other possible job title variations:
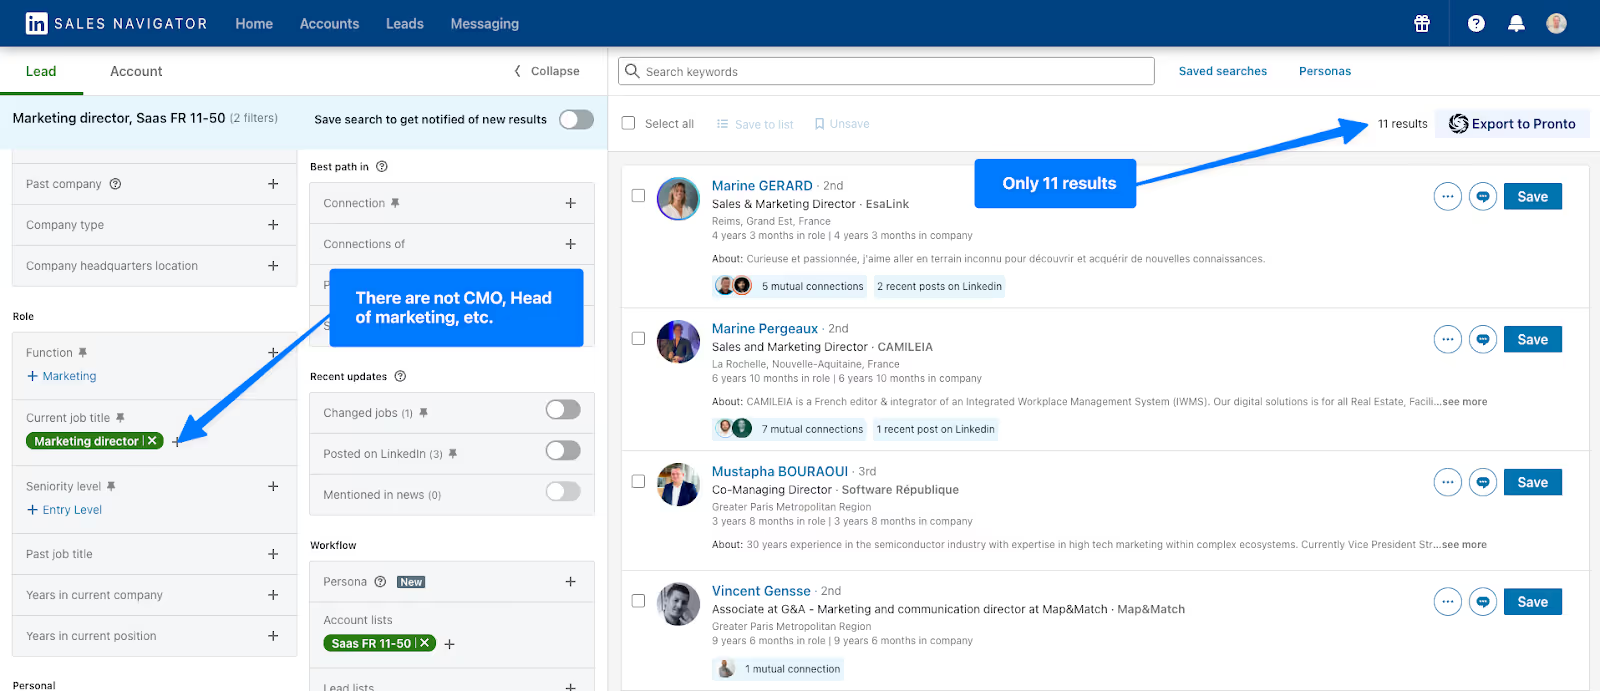
Moreover, you will often encounter targeting issues, and Sales Navigator may provide you with individuals who do not match your search at all, such as assistants, interns, etc.
To address this, we’ll use Boolean search:
- OR: To search for at least one keyword in a list
- AND: To search for multiple keywords
- NOT: To exclude keywords
- ( ): To combine AND, OR, NOT
- “ ”: To search for exact phrases
Here are two Boolean search templates to help you build them:
✅ (Status keyword) AND (Function keyword) NOT (Keyword to exclude)
✅ (Job title variation) NOT (Keyword to exclude)
Specifically, it looks like this:
(founder OR “co-founder” OR CEO OR “managing director” OR “general manager”) NOT (assistant OR intern OR trainee)
(“head of” OR director OR manager) AND (sales OR marketing) NOT (assistant OR intern OR trainee)
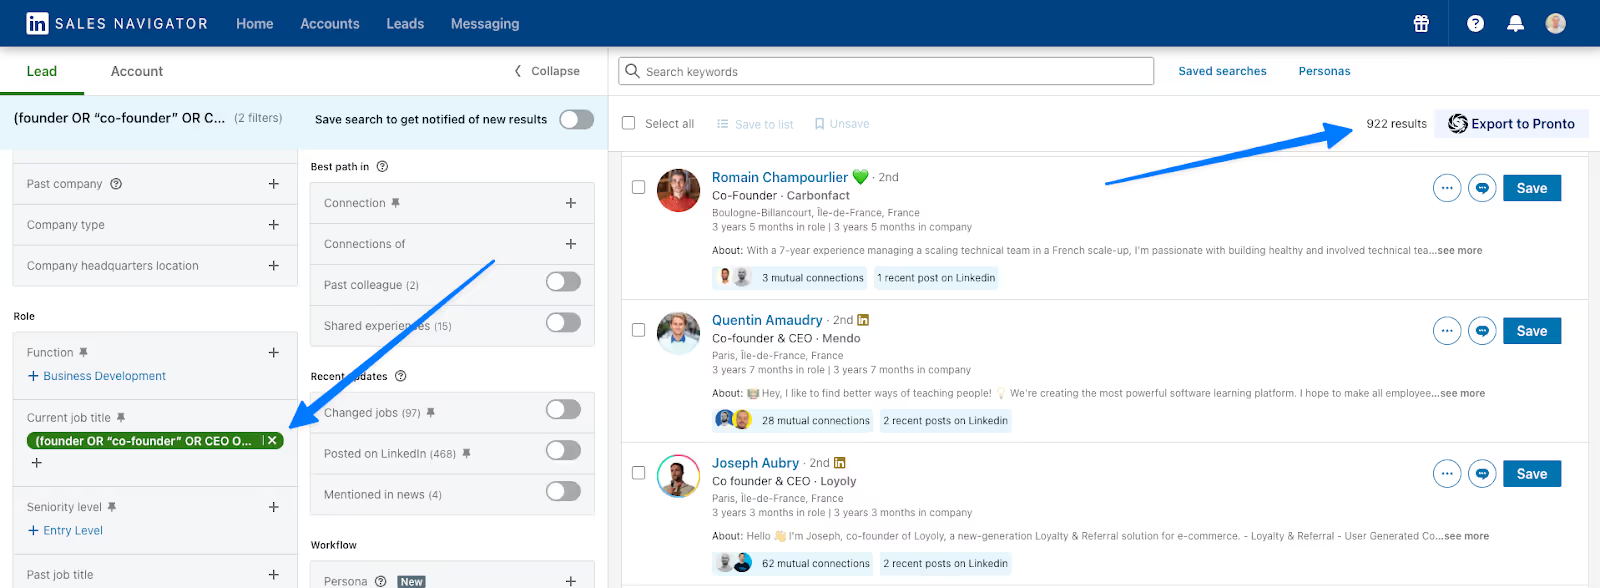
To help you build your Boolean searches and ensure you don’t miss any job titles, you can use:
👉 Pharow’s Parsinator
👉 Chat GPT
Of course, I wouldn’t leave you like this. Here’s a little hack to make your life easier and avoid wasting time building Boolean searches. Go to Pronto, under “New Playbook,” “Find leads,” and “Specific persona”:

Select the status keywords, function keywords, translate the job titles into French if necessary, add the feminine forms, exclude juniors, and your search is ready. Then click on “See in LinkedIn”:
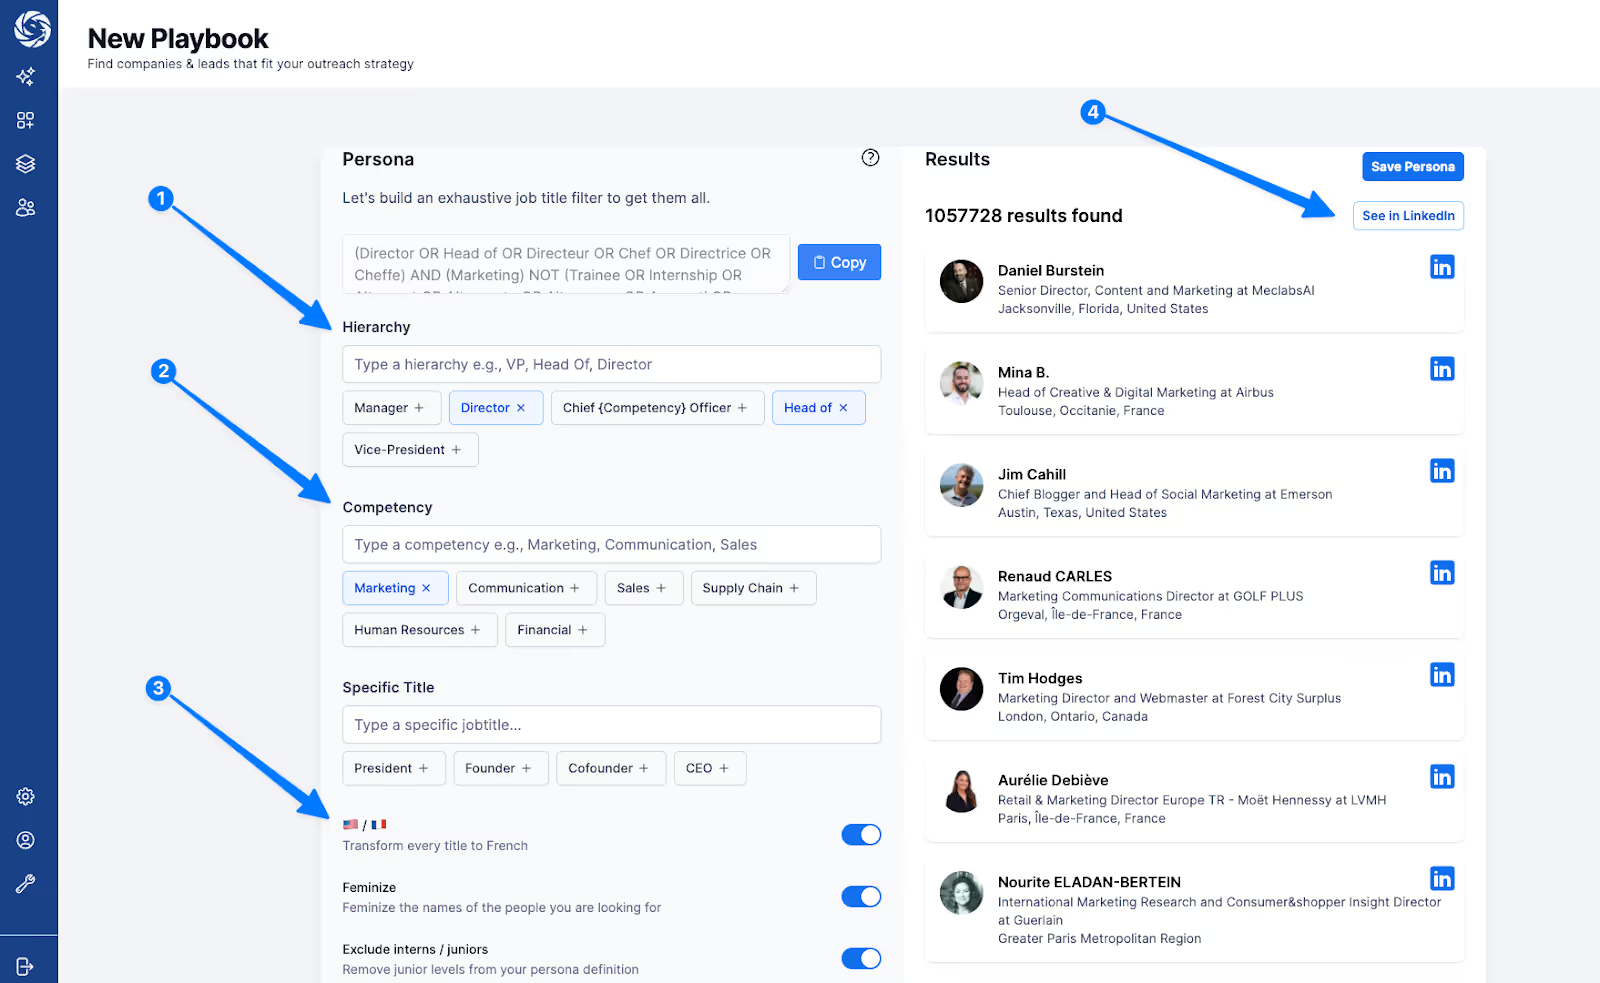
Your Boolean search is automatically done on Sales Navigator, all you have to do is add your account list:
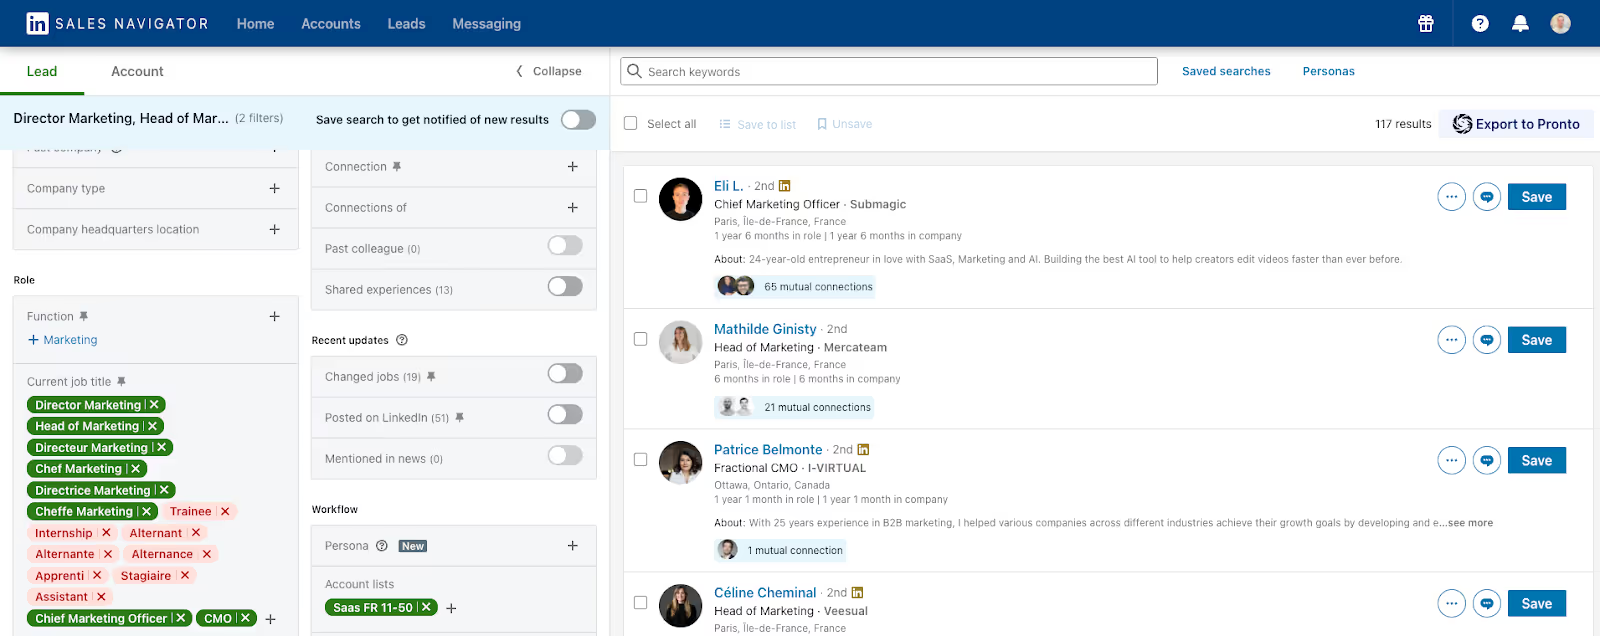
Now refine your search with criteria relevant to your persona. For example, in this list, I want to target only people who were hired less than a year ago because I believe the conversion potential is higher with these individuals:
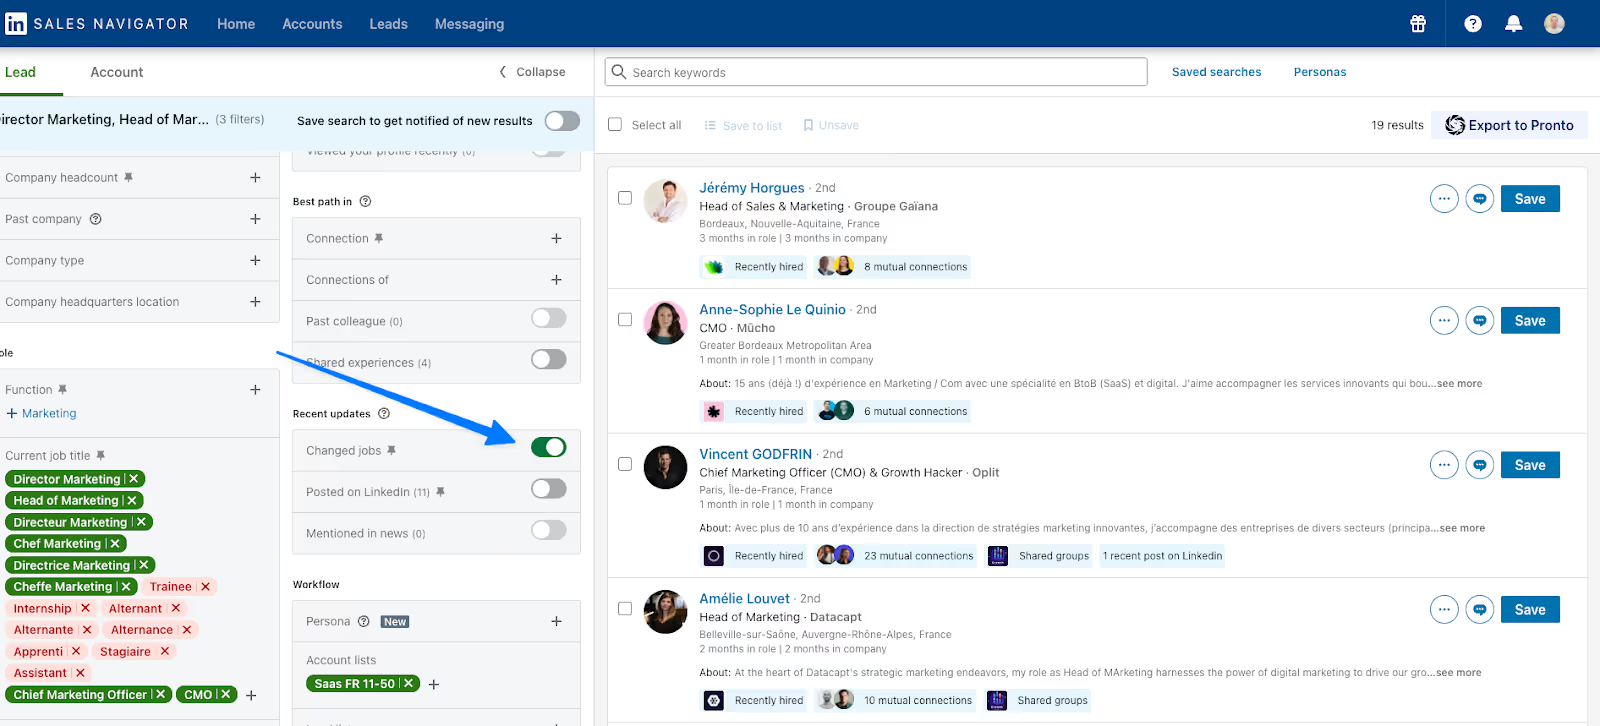
At this stage, you have a list of qualified leads that perfectly match your ICP and persona criteria.
Stay with me, and I’ll show you how to use this list effectively!
Using Saved Searches to Never Miss an Opportunity
In some cases, it might be a good idea to save your search.
Pro Tip: Save your searches to receive real-time alerts when new leads fit your criteria — never miss an opportunity again.

You can find your saved searches on the Sales Navigator homepage:

Saving Your Persona
Right next to “Saved Searches,” you’ll also find the “Personas” section:

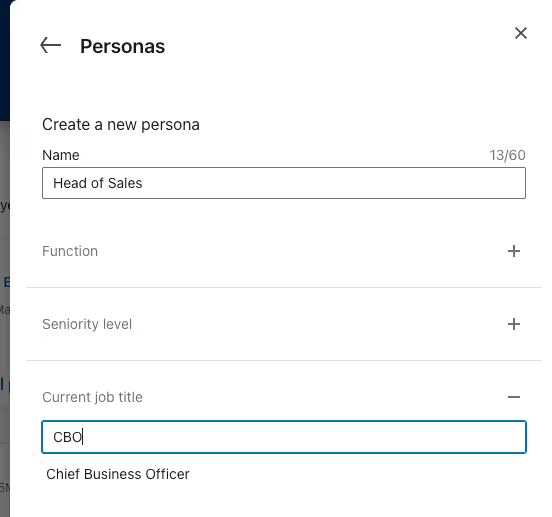
Here, you can input the job titles of your persona to easily reuse them in future searches.
While it’s a great idea from LinkedIn, this feature still has its limitations. You can only add the job titles suggested by Sales Navigator.
For example, you can add Chief Business Officer but not CBO :
But don’t worry, I’ve got a solution to make this easier.
Go back to Pronto. After creating your Boolean search, just above “See in LinkedIn,” click on “Save persona”:

Enter all the necessary information about your persona: Description, problem, solution, etc., and confirm.
And there you go! Your persona is saved and ready to be reused at any time in your future searches from Pronto.
Exporting Your lead Lists to CSV
Now that your lead lists are ready, you need to export them from Sales Navigator to enrich their contact data (email, phone number, etc.).
Sales Navigator doesn’t allow you to export profiles directly, so you’ll need to use an external tool to scrape your search and extract all the information from your contacts profiles.
For this, you can use Pronto again. Simply create an account on the tool, download the Chrome extension, and you’ll see a small “Export to Pronto” button appear in the top-right corner of your searches:

Just click it to start exporting your leads.
For more details on exporting leads from Sales Navigator, I invite you to read our article that outlines the entire process : How To Export Leads From LinkedIn Sales Navigator To Excel? [FREE 2024]
Using buyer intent to generate quick results
If you’ve made it this far, you can already consider yourself a semi-pro at LinkedIn Sales Navigator.
But stick with me a little longer, and I'll take you to the next level with the best tips for generating appointments.
Leveraging Profile Views
If someone visits your profile, it means something has caught their attention, but you don’t know what… It’s up to you to find out.
In lead search, you can filter to see all the people who have recently viewed your profile:
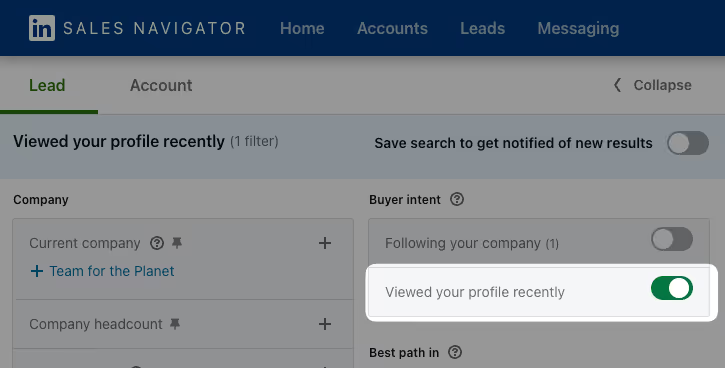
1️⃣ Enter your persona’s criteria to keep only those who fit your target.
2️⃣ Then start a conversation with them using a message like this, for example:
"Hi [First Name],
I just saw you visited my profile. Since I’m curious, I’m wondering what brought you here. :)
Do you have any questions about [your activity]?"
Using Your Connections
Few people think to look into their network before searching for contacts elsewhere, but I’m sure yours is full of opportunities.
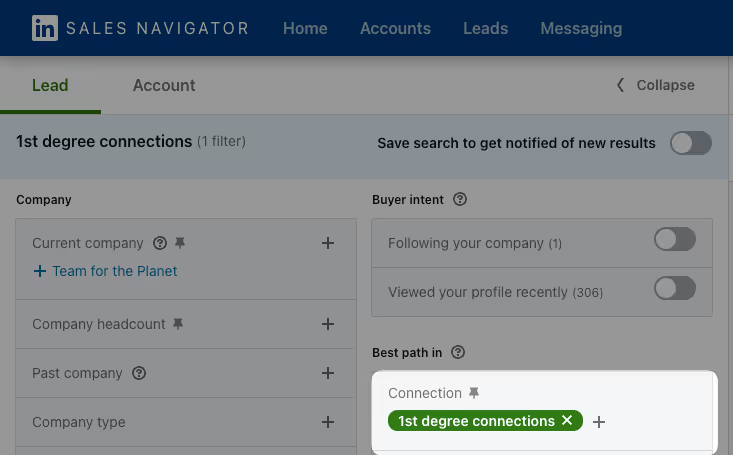
1️⃣ In the lead search, look for “1st-degree connections”:
2️⃣ Refine your contacts and send a message to those who match your target:
"Hey [First Name],
I’ve seen your posts on LinkedIn for a while now, but we’ve never had the chance to connect.
I’d be interested in learning more about what you do! :)"
👉 The goal here, just like with the previous message, is to spark a conversation with your prospect and gradually identify whether there’s a need for your product/service.
Using 2nd-Degree Connections
Second-degree connections are those with whom you share at least one mutual connection.
Here too, you can quickly find opportunities.
1️⃣ You know the drill: go to your lead search and select “2nd-degree connections”:
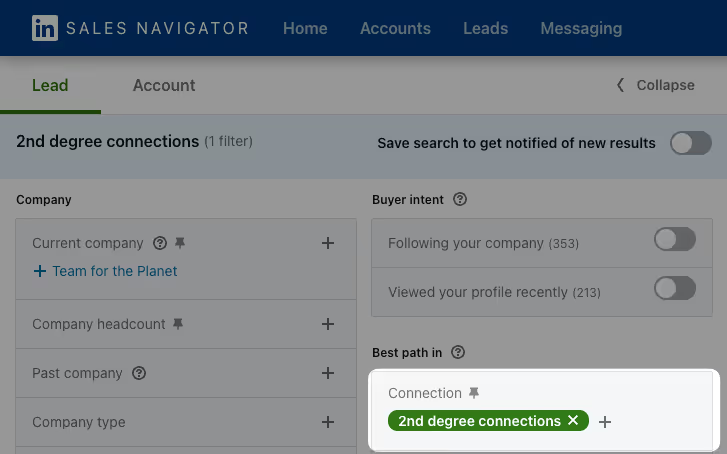
2️⃣ Enter your persona’s criteria and check the mutual connections you have with each prospect. If you genuinely know the mutual connection, ask them to introduce you to the person.
3️⃣ Then, you could send a message like this:
"Hello [First Name], I’m reaching out on behalf of [mutual connection], nice to meet you!
I wanted to learn more about how you handle [topic related to their activity] in your company ?"
Using people they have recently changed job
Sales Navigator allows you to target individuals who were recently hired or promoted.
Pro Tip: A new hire in a company is naturally more open to change than someone who has been working the same way for 10 years. This might be the perfect time to propose your product/service.
You can send a message congratulating them on their new role and asking an open-ended question related to your activity.
The Problem? Everyone does this. Your message might get lost among all the other similar ones they receive.
The Solution? Take a different approach.
Pro Tip: Someone got promoted? Their old role may be open. Use this as a smart opening to connect with their former team.
For example: Company X has a new Head of Sales, which means Company Y may no longer have a Head of Sales. This could be a good opportunity to offer your support during their recruitment process.
You could send a message like this:
Hello [First Name], I was wondering if you’ve already found someone to replace [Name of the person who left]?
Wait for a response, and if you don’t get one, follow up with a message like:
If not, [value proposition]. If it makes sense, I’d be happy to discuss it for 15 minutes next week. What do you think?
Targeting People Who Post on LinkedIn
If someone is posting on LinkedIn, it means they are active on the platform, increasing the chances of them responding to you.
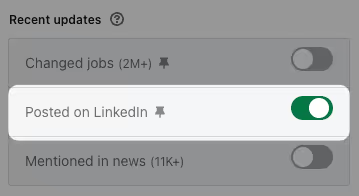
You can use this filter to segment your leads into those who are active and those who are not:
Additionally, you can use their latest post as an icebreaker.
For example, you could send a message like:
Hello [First Name], I just saw your latest post on [topic]. I think that [share your perspective]. By the way, how do you handle [topic related to your activity]?
Targeting Former Clients
The idea here is to target prospects who previously worked for one of your clients. They may already know your product from their previous experience, which means they’re familiar with it, or they may not have used your product but can be intrigued by the social proof of their former employer.
1️⃣ Apply your persona filters.
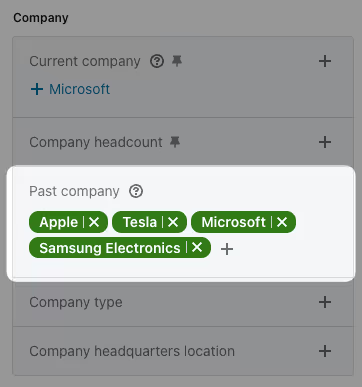
2️⃣ In the “past company” filter, enter several of your former clients.
3️⃣ Then, address them with a message like this:
Hello [First Name], I noticed you worked at [former company]. They use our [product] to achieve [result]. If it makes sense, I’d love to show you how we could help you achieve similar results at [current company].
ABM Strategy: Tracking News and Mapping Key Accounts
If your sales prospecting relies on an ABM (Account-Based Marketing) strategy, you’ll likely need to be alerted when a new event occurs on one of your key accounts.
To do this, you can add a company as a favorite:

This way, you’ll be notified whenever a new event happens on the account — department growth, role changes, new decision-makers, news related to the company, etc.
You can also map your accounts directly from LinkedIn Sales Navigator:
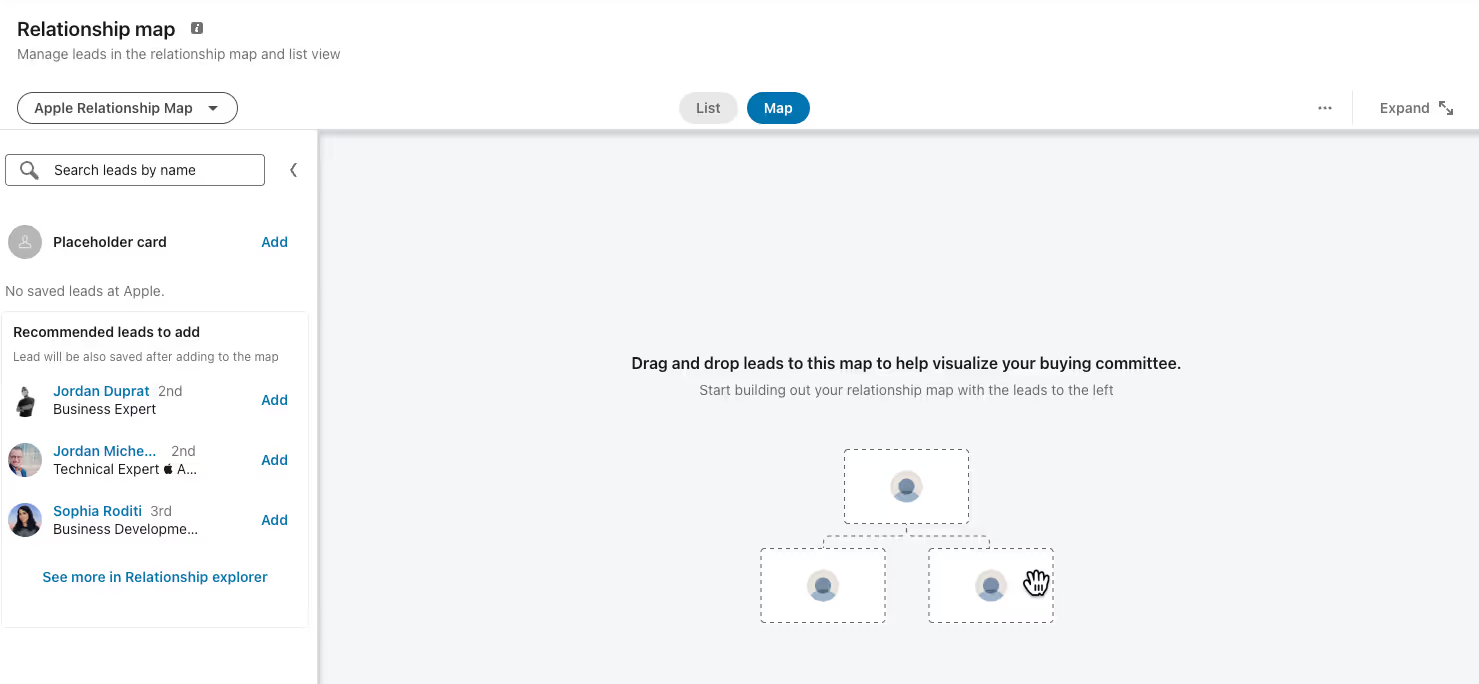
If you want to take this even further, check out our guide on LinkedIn account-based marketing to build a more structured and strategic approach.
Using InMail to Contact People You’re Not Connected With
To interact and establish relationships with people on LinkedIn, you must be connected with them.
LinkedIn Sales Navigator allows you to send InMail messages to people who are not part of your connections.
Go to one of your prospect's profiles, click on "Message," and a window will open in the bottom right corner. Type your message and send it:
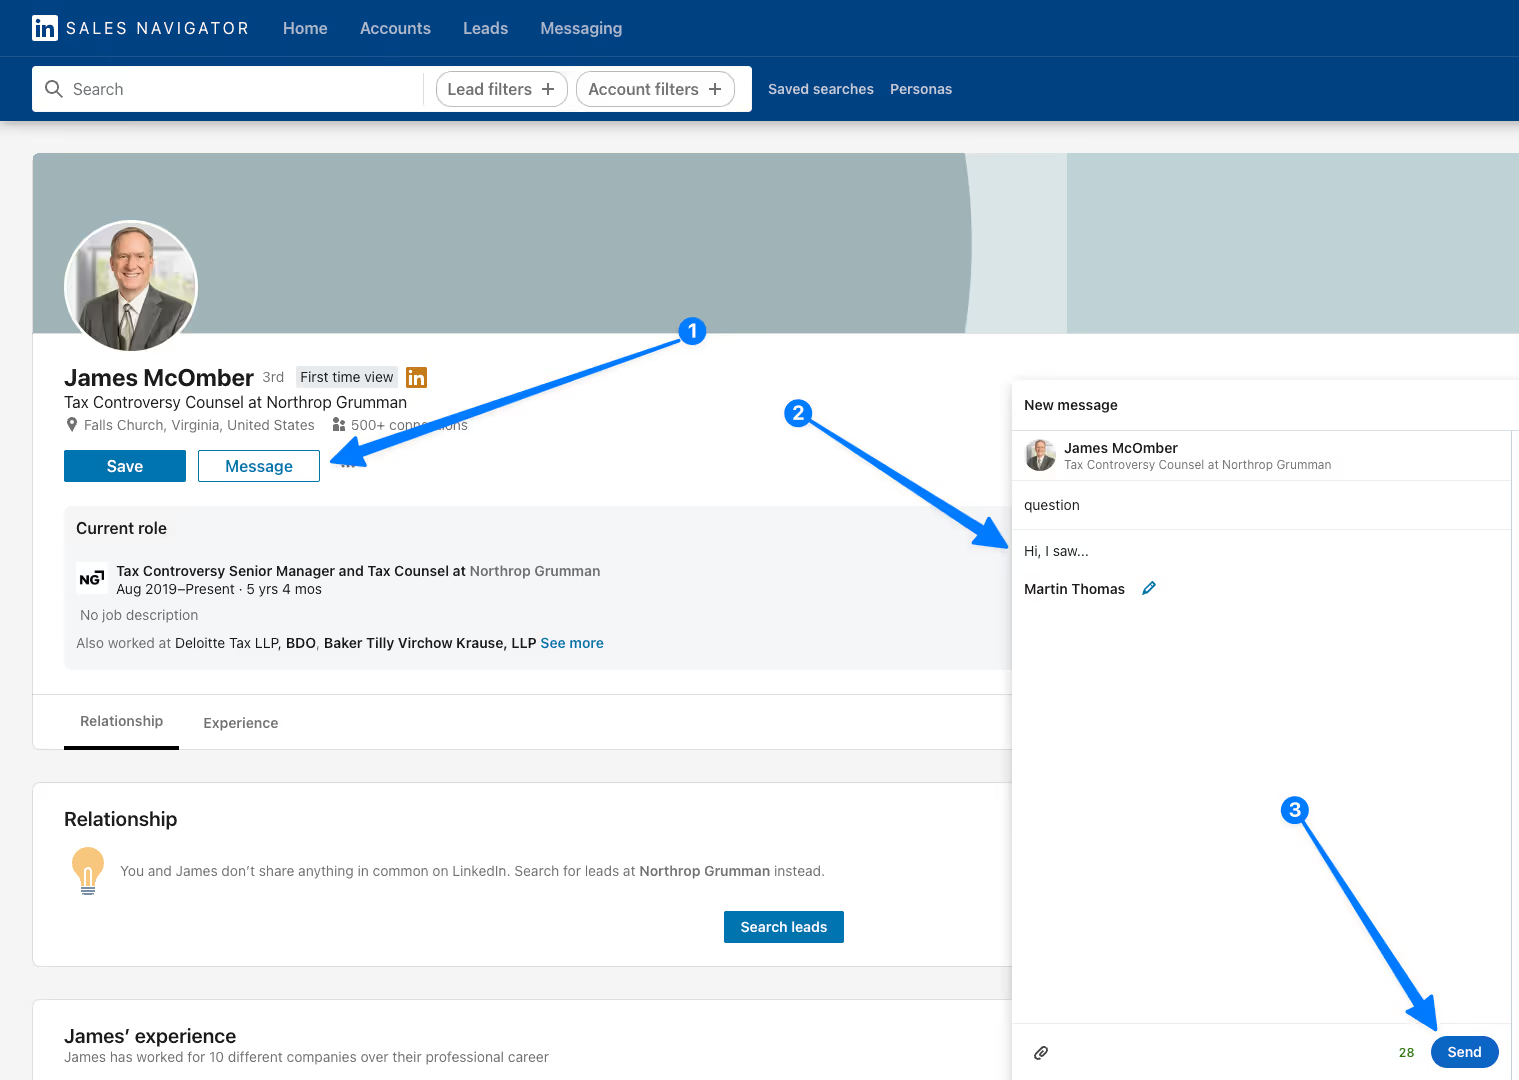
The message will arrive in your leads' inbox, even if you don't have them online !
You have a limited number of credits depending on your LinkedIn Sales Navigator subscription.
Mistakes to Avoid on Sales Navigator
Not Checking and Cleaning lead Lists After Exporting
Even if you use all the best tips to create your prospecting lists, you’ll always have "false positives" — people who don’t fit your search criteria at all.
Pro Tip: Always clean your lead lists post-export — precision = higher ROI.
For example, here I’m looking for CMOs, but when I go to the last pages, I see results that don’t match my original search criteria:
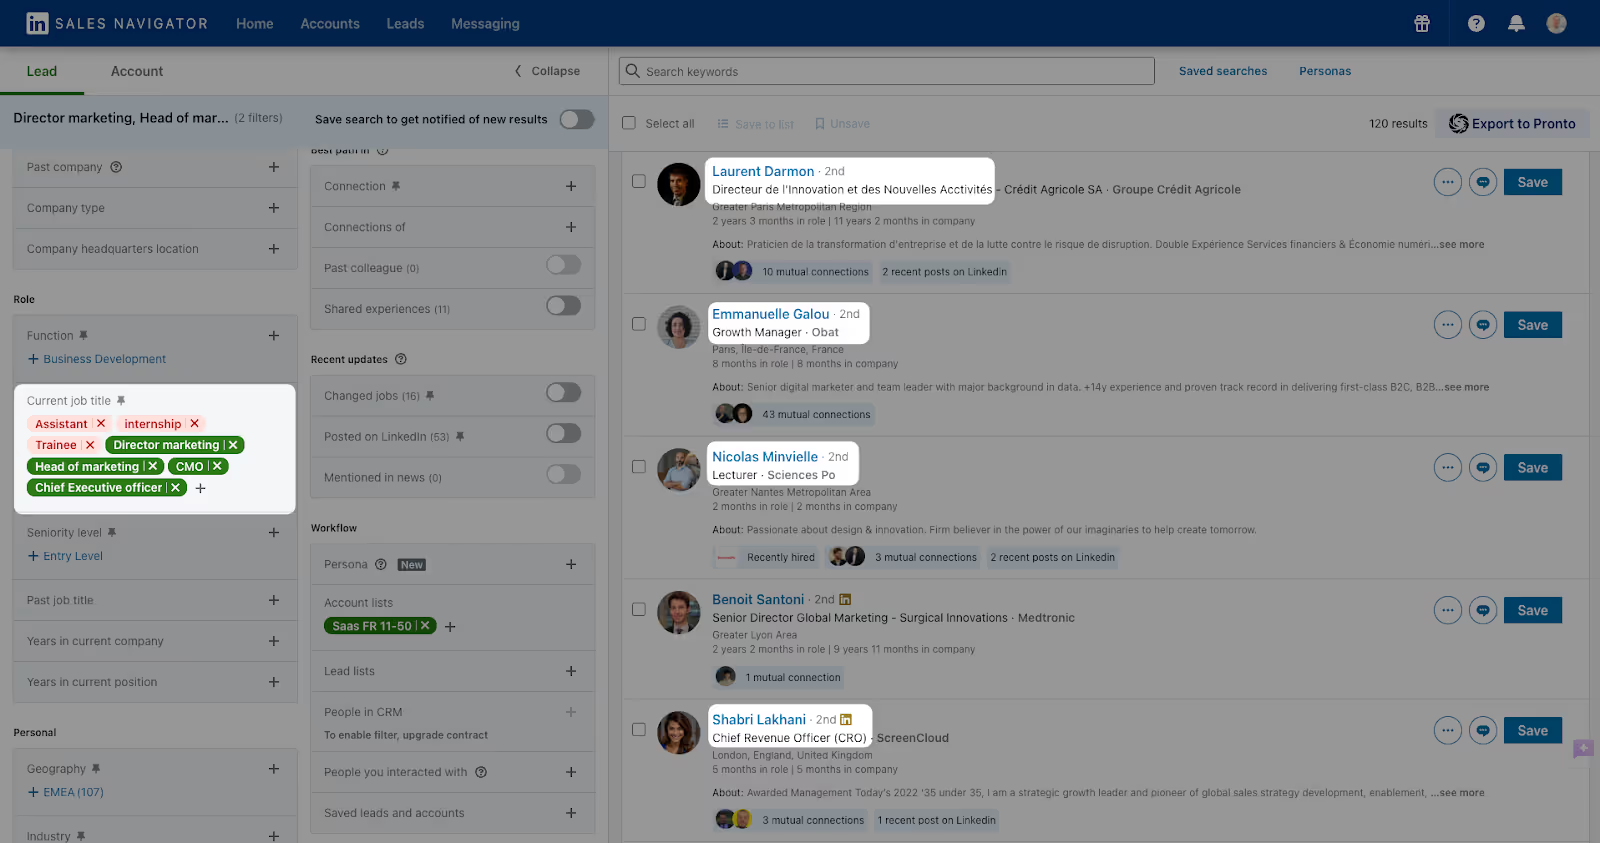
To address this, you have two options:
1️⃣ After exporting your list, import it into a Google Sheet and clean it manually.
2️⃣ Use Pronto, which automatically qualifies your leads when you export. Next to each lead, you’ll see "qualified" or "not qualified" depending on whether the lead and their company match your search criteria:
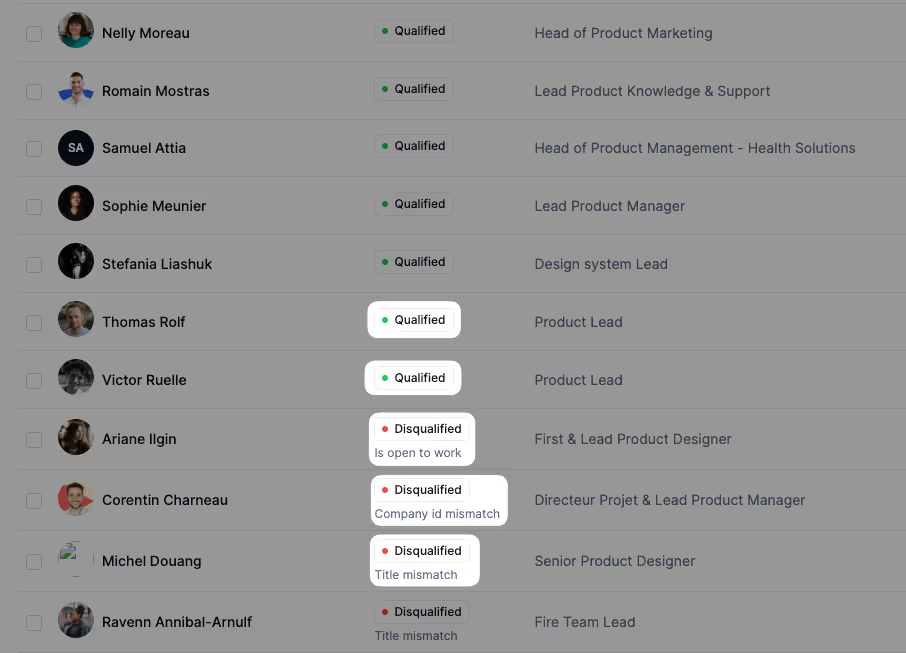
Using the “Technology” Filter
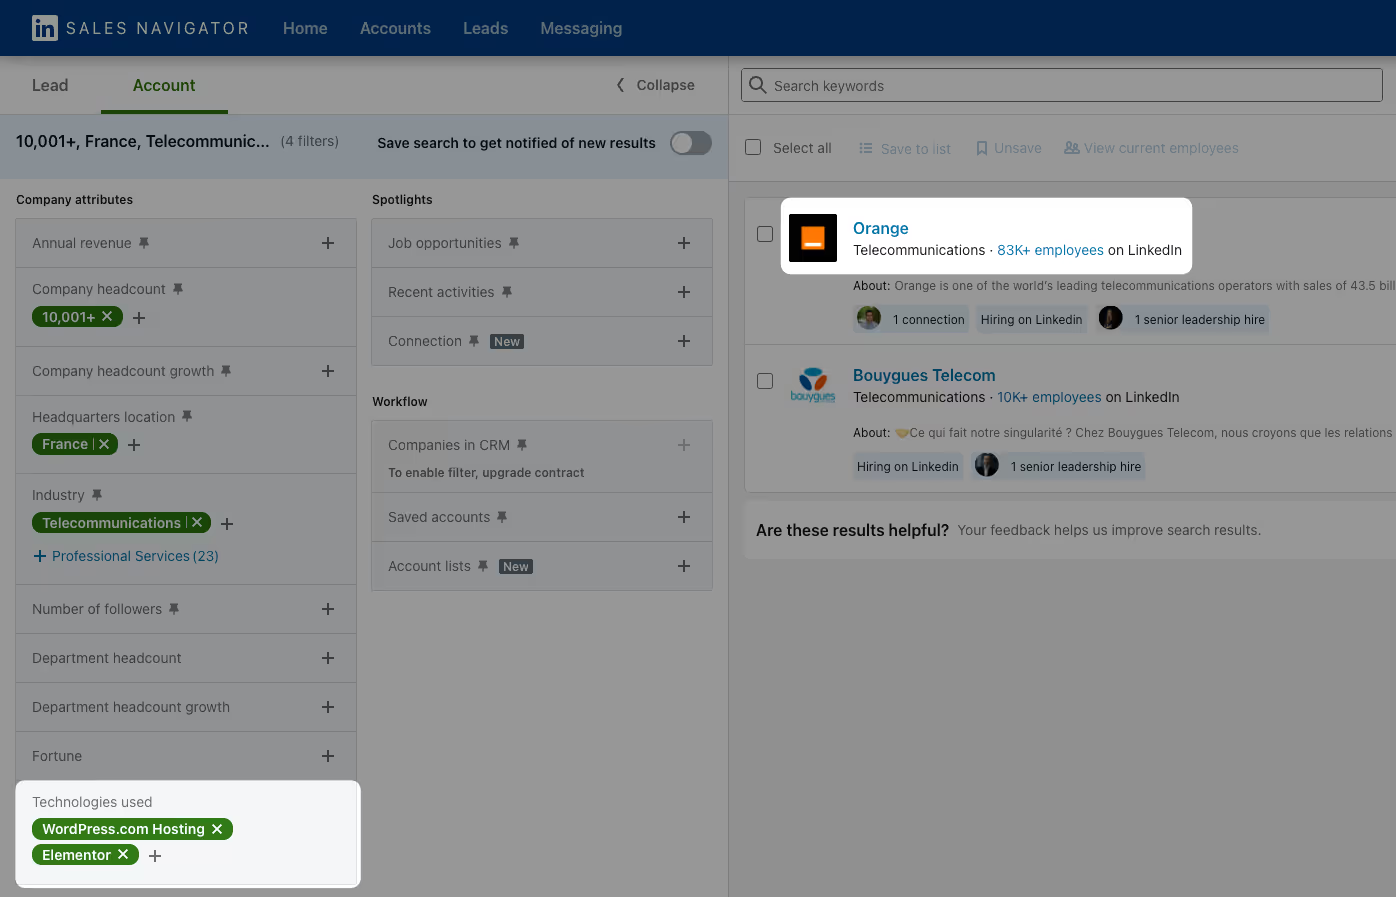
Avoid this one. The data source LinkedIn uses is unclear, and it often contains errors.
For example, Sales Navigator shows that Orange uses WordPress with Elementor:
However, when I visit their website to check which CMS they’re using, I find they actually use "Drupal":
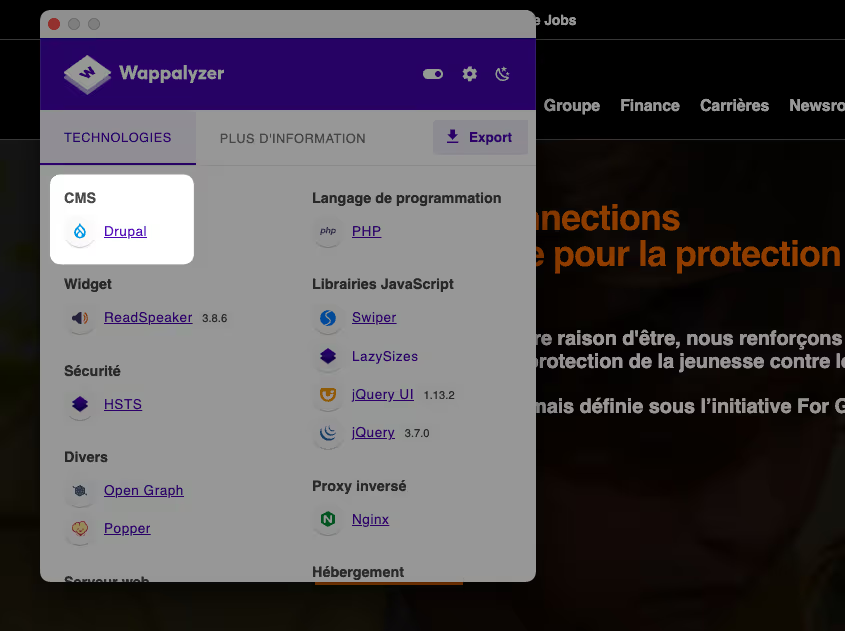
If you want to see the technologies your prospects are using, you can use BuiltWith or Wappalyzer instead.
Using the “Industry” Filter When Searching for Leads
It refers to the industry listed on an individual’s profile. It should not be confused with the industry of the company you’re targeting :
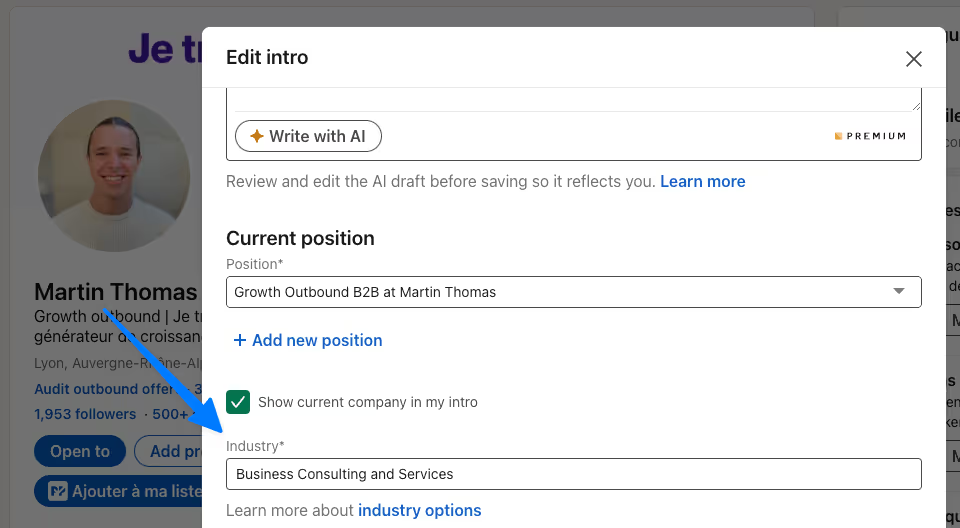
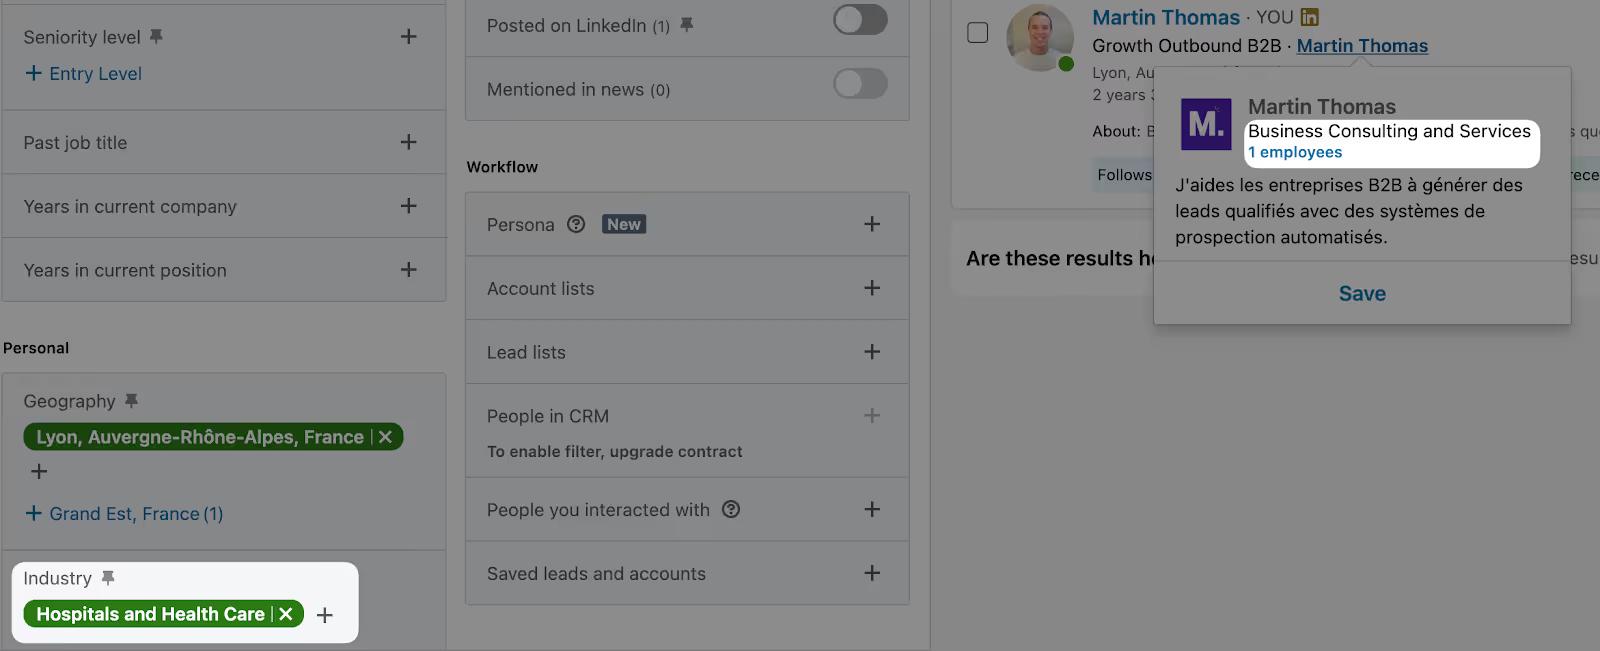
Using this filter may lead to irrelevant results because many people list an industry that differs from their company’s sector.
For example, I’ve listed "Hospitals and Health Care" as my industry on my profile, so I appear when someone targets this filter. However, my company operates in the "Business Consulting and Services" sector:
Using the “Function” and “Seniority Level” Filters
One of the common pitfalls with Sales Navigator is using the "Function" and "Seniority Level" filters. At first glance, they seem practical for targeting leads, but these filters will give you results that are too broad and often inaccurate, leading to a lot of irrelevant data in your searches.
✔️ For seniority level, LinkedIn uses the information provided by users when they add their managers, which is not always the case... Otherwise, LinkedIn tries to guess it based on two pieces of information:
- The job title.
- The hierarchical relationships between people.
✔️ For the function filter, LinkedIn tries to guess it based on your job title. In both cases, the algorithm is too unpredictable and often gives incorrect results.
Moreover, when a person has multiple active experiences (which is often the case), LinkedIn assigns a function and a seniority level for each experience. This is one of the reasons why it generates a lot of irrelevant results in your lists.
For example, Nicolas Fernandez-Le Follic is listed under the "Community and Social Services" function, even though he is a founder:
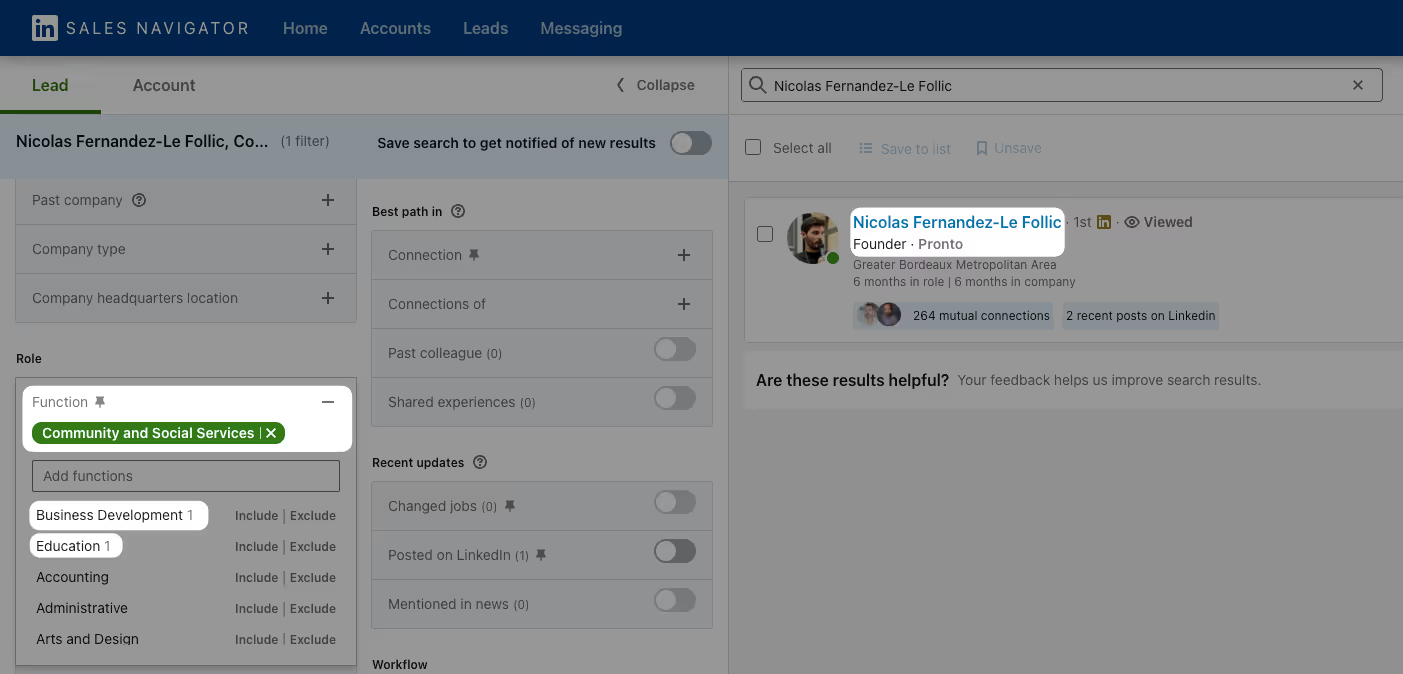
He is also categorized under "Business Development" and "Education"...
Similarly, for his seniority level, LinkedIn sales Navigator tells us that he is simultaneously "Owner/Partner," "Senior," and "Entry Level" :
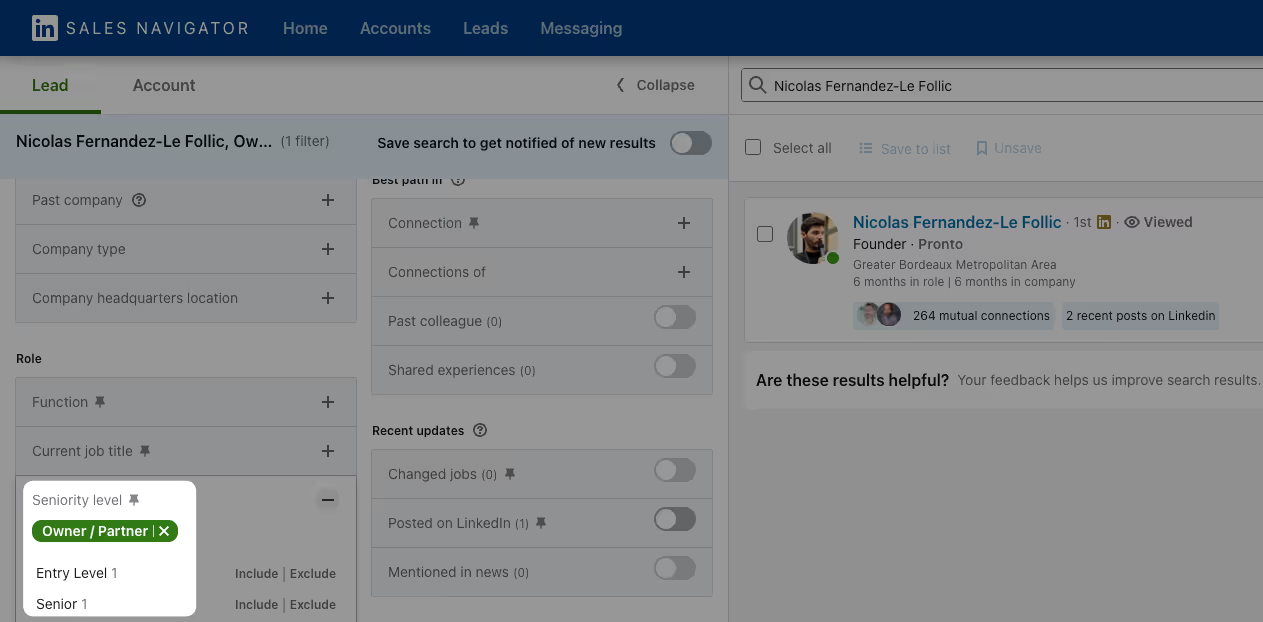
You get the idea, don’t use these filters. Use the job title search instead.

FAQ
What are the features of Sales Navigator Advanced?
Sales Navigator Advanced offers collaborative tools such as TeamLink (access to your colleagues' 2nd- and 3rd-degree connections), SmartLinks (content sharing and tracking to measure prospect engagement), and account list imports via CSV. These features optimize prospecting and facilitate teamwork.
What are the features of Sales Navigator Advanced Plus?
Sales Navigator Advanced Plus is designed for large enterprises. It includes advanced features like TeamLink Extend (access to 2nd- and 3rd-degree connections of your entire company, even those not using LinkedIn Sales Navigator), real-time updates (notifications of job changes among prospects in your CRM), and bidirectional CRM integration with tools like Salesforce.
How can Sales Navigator be used for recruitment?
LinkedIn Sales Navigator is primarily designed for sales prospecting. For recruitment, LinkedIn Recruiter is specifically tailored to recruiting needs.
However, you can still use LinkedIn Sales Navigator for recruitment with advanced search filters and the ability to send InMails. However, you won’t have access to key LinkedIn Recruiter features, such as recruiter-specific filters or application management tools.
What is the difference between LinkedIn Premium and Sales Navigator?
LinkedIn Premium is designed to expand your network and access professional insights, while Sales Navigator focuses on B2B prospecting.
+30 Sales Hacks
Agencies, GTM & Sales


